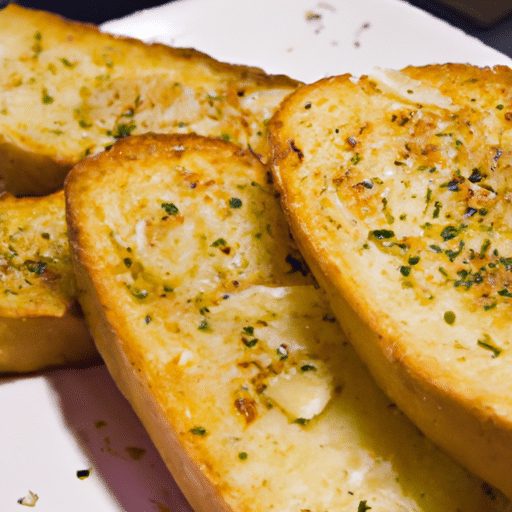
If you’ve ever craved the golden, crispy perfection of garlic bread without the guilt of deep frying, look no further! In this article, we will guide you through the simple steps of making air-fried garlic bread that will leave your taste buds singing. From the aroma of freshly minced garlic to the satisfying crunch of the bread, this recipe is a game-changer for garlic bread lovers everywhere. Get ready to indulge in a delightful twist on this classic favorite and discover a healthier way to enjoy the irresistible flavors of garlic-infused bread.
How Do I Make Air-fried Garlic Bread?
Garlic bread is a delicious side dish or snack that complements a wide range of meals. It’s the perfect combination of crispy bread, savory garlic, and a hint of herbs and spices. While traditionally garlic bread is made by baking it in the oven, you can also achieve great results by using an air fryer. In this article, we’ll guide you through the process of making air-fried garlic bread, from the ingredients you’ll need to the cooking instructions, serving suggestions, and even some tips and variations to customize your garlic bread experience.
Ingredients
To make air-fried garlic bread, you will need the following ingredients:
Bread
First and foremost, you’ll need a loaf of bread. The type of bread you choose will greatly impact the taste and texture of your garlic bread. While you can use any bread of your preference, we recommend opting for a rustic Italian or French loaf. These breads have a sturdy crust and a soft, airy interior that pairs perfectly with the garlic and butter.
Garlic
Garlic is the star of the show when it comes to garlic bread. You’ll need fresh garlic cloves to create the flavorful garlic butter spread. The amount of garlic you use can vary depending on your personal preference. If you’re a garlic lover, you can use a generous amount, but if you prefer a milder garlic flavor, you can adjust accordingly.
Butter
Butter is the essential ingredient that adds richness and moisture to your garlic bread. You’ll need to use unsalted butter for the garlic butter spread. You can choose to use salted butter if that’s what you have on hand, but be mindful of the additional salt content.
Olive Oil
While not a traditional ingredient in garlic bread, adding a small amount of olive oil to the garlic butter mixture can enhance the flavor and provide a smoother consistency. It helps the spread to evenly coat the bread slices and prevents them from becoming dry during the air-frying process.
Herbs and Spices
To elevate your garlic bread’s flavor profile, you can add a variety of herbs and spices. Classic choices include parsley, oregano, basil, or thyme. These herbs can be fresh or dried, depending on what you have available. You can also experiment with other seasonings such as paprika, chili flakes, or grated Parmesan cheese to add a spicy or cheesy kick to your garlic bread.
Preparation
Before getting into the cooking process, there are a few preparation steps to follow:
Preheat the Air Fryer
Similar to preheating an oven, it’s important to preheat your air fryer. This will ensure that the garlic bread cooks evenly and achieves that perfect golden brown crispiness. Set your air fryer to the recommended temperature specified in your air fryer’s manual. Typically, preheating takes around 5 minutes.
Prepare the Garlic Butter Spread
To make the garlic butter spread, start by mincing the desired amount of fresh garlic cloves. In a small bowl, soften the unsalted butter and mix it well with the minced garlic. For added flavor and smoothness, you can incorporate a dash of olive oil. Lastly, season the mixture with your chosen herbs and spices, ensuring they are evenly distributed.
Slice the Bread
Take your loaf of bread and slice it into even pieces. The thickness of the slices can vary depending on your preference, but aim for slices that are around 1 inch thick. Cutting the bread evenly will ensure consistent cooking and a satisfying garlic bread experience.
Spread the Garlic Butter Mixture
Using a butter knife or a silicone brush, spread the garlic butter mixture generously on both sides of each bread slice. Make sure to cover the entire surface for maximum flavor. The butter will melt when air-frying, infusing the bread with the aromatic garlic and herbs.
Sprinkle Herbs and Spices
To add an extra pop of flavor and visual appeal, sprinkle additional herbs and spices on top of the garlic butter-coated slices. This step is optional but highly recommended if you enjoy a more pronounced herb-infused garlic bread.
Cooking
Now that your garlic bread is prepped and ready, it’s time to start cooking:
Preheat the Air Fryer
Ensure that your air fryer is preheated to the recommended temperature. This step will guarantee the crispy exterior while keeping the inside of the bread soft and flavorful.
Place the Bread in the Air Fryer
Carefully place the prepared garlic bread slices in the air fryer basket, making sure they are not overlapping. Leave some space between each slice to allow for proper air circulation and even cooking. Depending on the size of your air fryer, you may need to cook the garlic bread in batches.
Cook at Specified Temperature and Time
Set the air fryer to the recommended temperature for garlic bread, usually around 350°F (175°C). The cooking time can vary depending on the thickness of the bread slices and the desired level of crispiness. Generally, garlic bread takes about 5 to 8 minutes to cook in an air fryer. However, it’s essential to keep an eye on the bread and adjust the time accordingly.
Flip Halfway Through Cooking
To ensure even browning on both sides, carefully flip the garlic bread slices once at the halfway mark. Use tongs or a spatula to gently turn them over without disturbing the spread. This step will help achieve that alluring golden color and prevent one side from becoming overly crispy.
Serving
The best time to enjoy your air-fried garlic bread is straight from the air fryer, while it’s still hot and crispy. Here are some serving suggestions to enhance your garlic bread experience:
Remove from Air Fryer
Using tongs, carefully remove the cooked garlic bread slices from the air fryer basket. Place them on a serving platter or a wooden cutting board, allowing them to cool slightly before serving.
Serve Hot
Garlic bread is best enjoyed when it’s warm and fresh out of the air fryer. The crispy exterior, infused with garlic and herbs, paired with the soft and tender interior, creates a delightful contrast in every bite. Serve the garlic bread as a side dish for pasta, soups, or salads, or enjoy it as a standalone snack.
Optional: Additional Toppings or Dips
If you’d like to take your garlic bread to the next level, consider adding some additional toppings or serving it with a variety of dips. Some popular options include grated Parmesan cheese, melted mozzarella, chopped fresh parsley, or a side of marinara sauce for dipping. These additions can further enhance the flavors and allow for personal customization.
Tips and Variations
Here are some tips and variations to consider when making air-fried garlic bread:
Choose the Right Bread
The choice of bread can greatly affect the overall taste and texture of your garlic bread. Experiment with different types of bread, such as sourdough, ciabatta, or whole wheat, to find the one that suits your personal preferences. Remember to adjust the cooking time accordingly, as different breads may require slight modifications.
Experiment with Seasonings and Herbs
While garlic is the main flavor in garlic bread, don’t shy away from experimenting with various seasonings and herbs. Try adding some crushed red pepper flakes for a spicy kick, or sprinkle some dried Italian seasoning for a Mediterranean twist. The possibilities are endless, so feel free to get creative and tailor the flavor profile to your liking.
Add Cheese for a Cheesy Garlic Bread
For cheese lovers, consider adding some grated or sliced cheese to your garlic bread. After spreading the garlic butter mixture on the bread slices, place a layer of cheese on top, and proceed with air frying as usual. The melty, gooey cheese will take your garlic bread to a whole new level of deliciousness.
Try Different Types of Spreads
While traditional garlic butter is the go-to spread for garlic bread, you can also experiment with different spreads to add an extra layer of flavor. Consider incorporating ingredients like pesto, sun-dried tomato paste, or even a mixture of roasted garlic and olive tapenade. These unique spreads can provide a delightful surprise and introduce exciting flavors to your garlic bread.
FAQs
To address any additional questions you may have, here are some frequently asked questions about air-fried garlic bread:
Can I Make Garlic Bread in a Regular Oven?
Absolutely! The traditional way to make garlic bread is by baking it in a regular oven. Preheat your oven to 375°F (190°C), place the prepared garlic bread on a baking sheet, and bake for about 10 to 12 minutes, or until the bread is golden brown and crispy. The cooking time may vary, so keep an eye on it to avoid burning.
Can I Use Frozen Bread?
While fresh bread is often preferred for garlic bread, you can also use frozen bread slices. Allow the frozen bread to thaw completely before spreading the garlic butter and air-frying as usual. Keep in mind that frozen bread may have a slightly different texture when compared to fresh bread, but it can still result in a tasty garlic bread.
Can I Make It Gluten-Free?
If you follow a gluten-free diet, you can still enjoy air-fried garlic bread by using gluten-free bread. There are various gluten-free bread options available in stores or you can even try making your own gluten-free bread. Follow the same preparation and cooking steps mentioned earlier, keeping in mind any modifications needed for gluten-free baking.
How Do I Store Leftovers?
If you have any leftover garlic bread, you can store it in an airtight container or a zip-top bag at room temperature for up to 2 days. To reheat and regain some of the crispiness, you can place the bread slices in a preheated oven or air fryer for a few minutes until warmed through. However, it’s worth noting that garlic bread is at its best when freshly made, so try to consume it soon after cooking for the best taste and texture.
Now that you have all the necessary instructions, tips, and variations, it’s time to embark on your air-fried garlic bread journey. Whether you’re serving it alongside a comforting pasta dish or enjoying it as a tasty snack, this homemade garlic bread will surely become a family favorite. So fire up that air fryer, gather your ingredients, and let’s get cooking! Enjoy your homemade, flavorful, and crispy garlic bread.


